Friday, May 28, 2010

Backup Heirloom Tomatoes

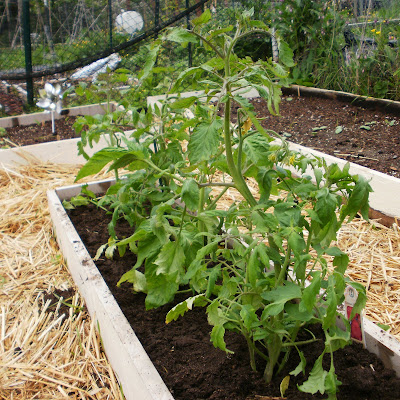
A week ago I planted my German Pink Tomatoes out in the garden. These are very special tomatoes to me because I started the plants myself from seeds saved by my son from tomatoes he grew in his garden last year with seeds given to him by one of his gardening neighbors. His neighbor tells of these tomato seeds being saved and passed down year after year since his family came to this country from Germany a hundred years ago. See what I mean, these are very special tomato plants! I have never started tomato plants from seed before, and without a greenhouse I struggled a bit to rig up an appropriate lighting and shelving system for growing plants from seed at home. I did the best I could and most of my plants seemed to patiently hang in there, but I felt they always looked to be a bit stressed, puny and struggled to grow. At first, signs of mold showed up on the top of each little peat pellet in which I had started the seeds, and then more mold after I transplanted them into bigger peat pots. Then there was an infestation of gnats that had to be dealt with. Somehow they managed to hang in there and lived. Giving up on growing seedlings in a peat-based material, once transplanted into plastic pots, they seemed to do better. Then it came time to harden them off and once again they were stressed. Not having a good place to harden plants off at home, a make-shift cold frame in my garden was the best that I could do. Unfortunately, it was very sunny during their first few days outside, and almost immediately some of their leaves showed signs of sun scorch. I partially covered their make-shift cold frame with the lid to the box to shade them a bit from the sun, but, unfortunately, damage had already been done. So far they are holding their own, hanging in there and have not yet died. They still look puny after losing some of their original leaves upon transplant into the garden, but I noticed just yesterday that they are beginning to sprout a few new leaves. I'm going to take this as a very good sign, and hope that this means I may actually get to eat some of my home-grown heirloom German Pink Tomatoes right out of my own garden.

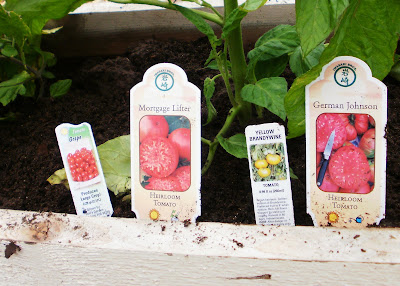
Meanwhile, at a local market I noticed a big rack of extremely healthy looking heirloom tomato plants marked at what seemed like an extremly low price. I could not resist. I purchased four of them and went straight to the Happy Valley Community Gardens and planted them in the last unplanted bed in my Garden Nbr. 02.
These tomato plants look very healthy and do sound promising. One is even called "German Johnson", another "Mortgage Lifter".Turns out the Mortgage Lifter tomato has an interesting history too. Developed in the 1940's by MC Byles, the owner of radiator repair shop and also known as Radiator Charlie. Wanting a better tomato, starting with a German Johnson tomato plant in the center of a ring of ten other types of tomatoes, with a baby's ear syringe he collected the pollen and squirted it onto the German Johnson. Each year he would save the seeds from the German Johnson and repeat the process, and after seven years he was satisfied that he had a stable tomato with all the qualities he was looking for. After that, he raised tomato plants each year and sold them for $1.00 each, paying off his mortgage with the proceeds.
It's an interesting story, and you can read more about it here - Mortgage Lifter Tomatoes.
I'll consider these our backup heirloom tomatoes.

Thursday, May 27, 2010

Blooming Things

Day after day, I can pour water out of the hose onto the plants in the garden when the sky above is its deep blue and, yes, it does keep the plants alive, keep them from withering away, keep them slowly growing, but, wow, after a day of steady drizzle, what a difference it makes. The garden starts to pop. And things start to bloom. Suddenly the buds on the irises have opened up to reveal absolutely huge flowers.
The flower stems on these lupin stretched up to be almost as tall as I am now that they, too, are blooming.Even the vegetable plants are beginning to bloom. Looks like there will be an early crop of peas very soon.
One day of rain and the fava beans are showing buds.
Standing on the outside looking in at Garden Nbr. 02, it was almost magical, as if recorded in a time-lapsed video, as little bean and squash plants were sprouting up through the soil.
More pics of blooming things on a day of drizzle in the gardens.

~~~

Tuesday, May 25, 2010

Barry's House - Insulation

A quick glance to the right as I walked through the door into Barry's new house and I could see the latest construction progress - insulation.Sheets of thick insulation now tightly fill the spaces between the rafters in the ceiling.And the walls have been lined with a different type of insulation. Apparently an insulating fabric is framed in between the studs, then a hole is punched in that fabric and the insulation is blown in to fill the space. It's like cotton to the touch, feeling like something you would want to use as batting for a quilt or to line a heavy winter coat.
This house is so well insulated now, standing in the middle of the room I could tell that it will be comfortable in there next winter when Barry stands there and looks outside through those big windows. Even when the gale force winds and heavy rains are blowing through Hales Passage, he will be warm and cozy!
Meanwhile, looks like Barry's been inspired to put in a garden. He's gathered up some of the scraps from his house-building project and built raised beds for potatoes, and with tomatoes planted so that their roots will get plenty of air, his garden is in.
Since he cut some of the lumber for me that I saved from a different construction job dumpster so that I could build many of the raised beds in my new Garden Nbr. 02 at the Happy Valley Community Gardens, and then let me borrow his truck so that I could haul in a couple of yards of soil to fill those beds, I'm going to count Barry's newly inspired garden as part of my Extreme Growing Challenge this year. Good job on that garden, Barry!

Monday, May 24, 2010

Moving

This is the reason why what felt like "Gorilla Gardening" for the past few weeks has been the focus. This move was pending. The week has finally arrived, and the task of packing is well under way.It almost feels like moving day has snuck up on us. But really, that can't be because this move has been looming ahead for quite some time. We've just been putting it off, procrastinating perhaps. What with putting in a new garden, and getting the existing garden in shape, there really was a lot of work that needed to be done this spring. We wanted that work to be history before having to focus on the move. With the gardens now under control, about all that needs to be done for the next little while is to keep them watered, and hope that weeds don't take over while we're packing, unpacking and settling in.

I don't like moving. Even with others doing the hard physical labor of lifting all those heavy boxes and furniture, it's still a lot of work. I'm a nester and enjoy a more settled feeling at home. I don't enjoy having my stuff packed up in boxes. Our friends are excited though because we'll be living much closer to many of them - and they are helping.

With plans for a summer filled with backyard barbeques and taking the dogs for swims at the river, I know that once all this hard work is finished I will like it, and that soon it will once again feel like home. It really will be fun and I am excited - just dreading all the work.

Sunday, May 23, 2010

Hen and Chicks

This plant must be extremely root bound. It has been growing in this same pot for at least twenty, gosh, maybe even closer to thirty years now. This pot of Hen and Chicks sat on my father's back deck surrounded by huge planters spilling over with pansies each summer for the longest time. Looking rather abandoned and dormant out there each winter as our Pacific Northwest rains, ice and snow pounded down, amazingly it always came back to life. It grew huge, spilling down the sides of its pot and sent up a flowering stem each summer. My kids and I liked it and often commented to Dad, Grandpa, what a cool plant it was.Delighted that he gave it to me when I purchased a house after I moved back from Africa, it's been with me since. It's been around the block a time or two, and for the last few years it's sat in the back yard at Sandy Point, pretty much ignored - but no longer. Now, with ample garden space at the Happy Valley Community Gardens, it has been moved to Garden Nbr. 02.

My son tells me that this is why he had to get himself a big pot of Hen and Chicks too. He said his was old and root bound when he got it and that he carefully pulled it all apart, pulling off the dead portions and burying the rooted stems even deeper. I should do that with this one, but not yet. For now, I think I'll just let it settle in at its new place of residency.

Saturday, May 22, 2010

More

More, lots more. More boards with more nails to remove, then more boards cut to size so that more raised beds could be built to complete Garden Number 02 at the Happy Valley Community Gardens. More thanks to Kathy for setting the boards aside, more thanks to Ron for making the boards available and more thanks to Barry for cutting the boards to size. What a wonderful community effort this new garden is as it never would have been possible without more help from all of you.
A quick trip to the hardware store for more screws, then more raised beds were built and set in place between the others. With more help, these new beds soon will be filled with more soil and then with more vegetables and flowers.
There was more sharing within this wonderful gardening community with half a tray of rapini (broccoli rabe) seedlings. Planted in Garden Nbr. 01, what a wonderful addition to this garden. More thanks!
Thinking back, I recall that my father was always very good at finding practical, yet unconventional uses for every day items. I think that he would be pleased that the perfect dibber for my garden tool basket has turned out to be that old carved bone handled knife sharpener that he gave me so many years ago when we were downsizing them from their house to the old folks home. It certainly made the perfect holes for planting those tiny little plants. More uses for more things!
Then, there was more spinach to harvest. The second cutting of this Spinach "America", it has quickly become a favorite. Grown from heirloom seed received at the Second Annual Seed Swap held in downtown Bellingham earlier this spring, even though the leaves seem to triple in size almost over night, it remains as tender and tasty as if a tiny, baby spinach leaf.
More - pics from the gardens.
~~~

~~~

Friday, May 21, 2010

Sweet Pea Trellis

With lots of different varieties of pole beans and plans to stake the cucumbers and some of the squashes, my stash of bamboo will soon be transformed into trellises of many different sizes and shapes. Quite a few of the bamboo poles cut from my cousin's yard were close to 25 feet long, so after sawing them into lenghths more suitable for building trellises, the wispy, top-most portions of the bamboo stalks were turned into a trellis for the sweet peas in Garden Nbr. 02 at the Happy Valley Community Gardens.
This trellis was certainly easy to make. Pushing the bamboo pieces into the soil around the perimiter of the sweet peas, the bamboo was pulled together at the top, wrapped and tied with twine. The twine was then woven down around the bamboo poles to form a support as the sweet peas grow and fill up the trellis.

Meanwhile, having focused this last week on sowing seeds in the new raised beds in Garden Nbr. 02, my other garden was beginning to look neglected as the fence line around it was being claimed by weeds. Yikes, it really was in need of some serious attention.
One of those jobs that I always seem to put off for far too long, Garden Nbr. 01 certainly does look better now that its done.
I like that I can actually see the fava beans - from the outside of the garden - now.

Saturday, May 15, 2010

Chive Blossom Vinegar

Oh my goodness. The aroma, that of a delicately sweet, oniony, slightly vinegary scent released as heated liquid pours over jars filled with fresh-from-the-garden chive blossoms. Absolutely wonderful! The first harvest of the season from the Happy Valley Community Gardens, Garden Nbr. 01, chive blossoms, one of those early bursts of spring color in the garden. While these lavendar colored, fluffy pompom-shaped flowers are great tossed into a salad or a bowl of soup, they make one of my favorite herb infused vinegars. A great way to preserve some of those herbs that seem to grow wild and crazy in the garden, herbal vinegars are extremely easy to make. About all there is to making some is to cut and wash the herbs.
Then simply stuff a bunch of the herbs into sterilized jars and fill the jars the rest of the way up with a good quality vinegar. When I make Chive Blossom Vinegar, I like to heat the vinegar before I pour it into the jars because the chive flavor is released almost instantly into the vinegar that way. Immediately after filling the jars with the hot vinegar, the color of the chive blossoms change from light lavendar to a very pretty deep, deep pink, purple.
If you want to skip the step of heating the vinegar, your herbal vinegars will turn out just fine though, because, either way, the jars of herbs and vinegar need to sit and steep for two or three weeks before their flavor has totally enfused. Maybe the reason I heat the vinegar is simply because I so enjoy that sense of instant satisfaction when that chivey aroma fills the air once the hot liquid hits the herbs.
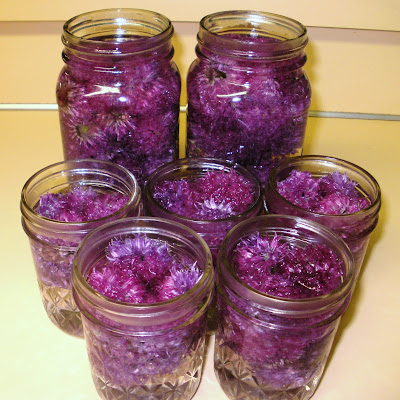
The chive blossom stems are quite tasty too and I save them after cutting off the chive blossoms, chop them up and package them for the freezer. Used directly from the freezer, they are a great addition to almost any cooked sauce, soup, stew, rice or potato dish.
Chive Blossom Vinegar can be used almost anytime wine, plain vinegar, lemon or lime juice is called for in a recipe. When added to a bottled barbecue sauce, it turns a possibly boring sauce into a fresh-tasting addition to the grill. My favorite use for Chive Blossom Vinegar though is as the base for a vinaigrette dressing. I use one part chive blossom vinegar to two parts olive oil, sometimes toss in a few other fresh herbs from the garden, shake it up and drizzle it over a bowl of garden-fresh salad fixings. Even better, try this Chive Blossom Vinegar dressing as a dipping sauce for homemade artisan bread fresh from the oven. Wonderful!
~~~
Step-by-step, making Chive Blossom Vinegar and preserving the stems.

~~~
Now, we count the days until a jar of this season's Chive Blossom Vinegar is ready to be opened.
Friday, May 14, 2010

Tulips and Irises

Pretty flowers make even a sunny day more bright. Thanks to daughter Jeni!

Monday, May 10, 2010

Garden Number 02 - First Planting

The soil throughout the Happy Valley neighborhood is clay, and located near a creek, the Community Gardens are not lacking in this heavy, slow-draining dirt. Without amendments, it's not uncommon to see an entire garden turned into a mucky, muddy bog after one of our Pacific Northwest rain showers. Thanks to the use of a truck, most of a beautiful sunny day was spent shoveling two loads (aka, two scoops - aka, two yards) of a garden-ready 5-way mix soil from the bulk materials section of Bakerview Nursery into the raised bed frames in my Garden Number 02. Last year, the beds in Garden Nbr. 01 were amended with this same soil and I was so pleased with the quality of that soil and success of that garden.
Thank you so very much for all that help. I never could have done it all in one day without you!
~~~
Because the base layer in the gardens is clay, I like to use straw in the walkways. Straw does a great job of keeping my feet out of the mud after a rain, and even though I have to add more straw every year or so, I like that it decomposes and eventually works itself into the clay. Picking up a bale of straw at the local Country Store on the way to my garden, in no time I had that straw spread throughout the walkways and was ready to begin planting.
At first, I thought it was a drum roll that I heard as I prepared to plant, but looking up, I saw it was actually the awesome performance of a pair of red tailed hawks soaring and diving overhead in their annual mating ritual.
~~~
Reserving the very center raised bed for flowers, my first "official" planting was giant sweet peas in the middle, then more flowers all around. As this bed will be the first one we see when entering the garden once the deer/rabbit-proof fishnet fencing is in place, how delightful it will be to watch it grow throughout the summer as it overflows with beautiful, sweet-smelling flowers.
~~~
Meanwhile, I really like how Garden Number 01 is growing and taking on a style of its very own.

Tuesday, May 4, 2010

Garden Number 2 - More Boards

Having built barely half of the raised beds needed for new Garden Number 02 at the Happy Valley Community Gardens, another day was spent digging through the construction scrap pile rescuing boards.I conside these boards to be a real "bargain" as having saved them from the construction dumpster, their price was zero dollars. They did come with nails though - lots of nails. Fortunately I had brought along my hammer and set to work. I had created quite a pile of old bent nails by the time those boards were cleaned and ready to be cut down to size.
So kind of that wonderful contractor to cut the boards for me, and of his helper to load them into my car. What a very lucky girl I was that day! Thank you both so very much.
Then I headed to my newly cleared and tilled garden spot with that load of lumber and started assembling more raised beds.
How cool it was when my puny drill started making hard work of screwing those boards together that a much better drill was made available to me.
In no time, I had the rest of the raised beds built and set in place in the garden.
Thank you so very, very much.

Sunday, May 2, 2010

Spitfires in the Garden

You would think that my Spitfire nasturtiums for the Seed Grow Project would have been planted by now, and you'd think that my Happy Valley Garden Nbr. 01 would have been the obvious place in which to plant them. After all, I have certainly been busy adding plants to this garden - perennials and annuals, fruits and flowers, vegetables and herbs. The chives, blueberries and strawberries are in full bloom and the garden is looking real good. Sweet peas, one of my favorite cut flowers, fill two different areas in Garden Nbr. 01. They are the "giant" kind, promising to grow over six feet tall and be covered with long stems of colorful, fragrant flowers. It's exciting to watch them stretch as they almost reach the trellises on which they will soon be climbing so high.
Nope, I'm not going to plant these Spitfire nasturtiums in Garden Nbr. 01. You see, there's hardly any room left in Garden Nbr. 01, and what space is left is already reserved for a few sunflowers, several kinds of pole beans, some pole peas, two or three tomato plants, a couple of eggplants and some patty pan squash. There's just no room for any Spitfire nasturtiums in Garden Nbr. 01 - so I'm going to plant them here, in my Garden Nbr. 02.
It's rather obvious that Garden Nbr. 02 is not quite ready for those Spitfire Nasturtiums, but progress is being made. The sod and weeds have been removed, and the soil turned with the shovel.
A friendly, fellow community gardener guy tilled the soil between, in, under and around the heavy rain showers this weekend.
The wire fencing that was originally around Garden Nbr. 02 has been removed, rolled up and stowed way until it's time to cut it up into sections and twine them together with bamboo poles in order to make the trellises needed later for the pole beans, peas and a couple of the vining squashes. A destination this week will be the harbor, where Bellingham's commercial fishing fleet discards their old fishing net. We'll get enough to make a new fence to keep this garden safe from all those hungry neighborhood deer and bunnies.
With more used lumber available, enough raised beds will be built to fill this entire 10' by 40' garden space. The truck is ready to haul in a couple of yards of 5-way garden soil to top-off these new beds, and straw will be placed down between the beds to help keep the weeds under control and to make a nice, mud-free walkway.
~~~
Then, then I'll be planting my Spitfire nasturtiums. I'll be filling one of these new raised beds with Renee's Gardens colorful Spitfire nasturtiums. Meanwhile, I'll try to remain patient as I daydream about those lovely nasturtiums growing totally out of control this summer in my Garden Nbr. 02.
~~~
"I'm growing Nasturtium "Spitfire" for the GROW project. Thanks, to Renee's Garden for the seeds."
~~~